A real person’s 5-step guide to putting up temporary wallpaper
Let's get one thing clear: I’m no DIY maven. I don’t wistfully wander the aisles of Home Depot on a Sunday afternoon. I consider framing a poster and nailing it to the wall a pretty major home improvement. So when I heard about temporary wallpaper--with its promise that all you have to do is peel off the backing, stick it, and remove it without a fuss when the lease is up--I was both intrigued and skeptical.
This weekend, I experimented with four panels of the stuff, courtesy of Chasing Paper, a New York City-based manufacturer of removable wallpaper. Below, the step-by-step process, plus lessons I learned along the way.
Paper: I chose one panel of the peel-and-stick chalkboard ($40), one panel of the “Book Worm” print in black and white ($30), and two panels of the "Wild" print in brown and white ($30 each)
Total cost: $153.26, including about $24 in taxes and shipping (Full disclosure: Chasing Paper discounted the paper for Brick, so we only paid $24 per panel, plus taxes and shipping.)
Total time: About an hour and a half for all four panels; the installation of the two "Wild" panels, which didn't require any cutting, took about half an hour
Tools: Damp cloth, measuring tape, pencil, scissors, heavy books

Four panels cost $130 plus tax and shipping
1. Pick a pattern
With so many companies out there making temporary wallpaper, there are hundreds of patterns to choose from; your problem won't be finding one you like but narrowing it down.
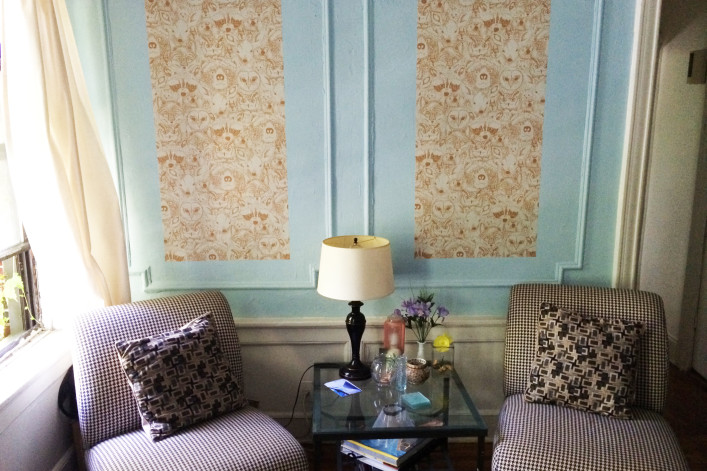
I knew right away that I wanted to test out the chalkboard panel, and thought it would be the perfect cover-up for my drab old fridge. I steered away from geometric or other modern-looking prints because I didn't think they would fit as well in my pre-war apartment or match the other antique-y pictures I have on the walls. And lastly, I wanted to try something fun and perhaps a bit wacky. After all, this stuff is temporary--why not take a risk?
Tip: If you're at all worried about a seamless installation, choose a more chaotic pattern. A happy accident of a print like "Wild" was that all the curving lines and shading made it a breeze to hide imperfections like bumps in the wall or bubbles in the paper. Also, many temporary wallpaper companies, including Chasing Paper, offer cheap samples so you can see if you like the pattern.
2. Prep your walls
My Chasing Paper order didn't come with instructions (and I couldn't find any on their website either). Luckily, Swag Paper, another temporary wallpaper maker, has a handy guide.
On their recommendation, I wiped the walls and the fridge with a damp cloth, getting rid of any dirt, dust, bits of tape and flecks of plaster clinging to holes where a previous tenant had put in nails.
Tip: If you have a few days between when your paper arrives and when you plan to put it up, take it out of the packaging (it arrives in a poster roll) and flatten it under a few books. I neglected to do this, but the curling edges made the cutting and sticking much trickier.

Running a damp cloth or sponge over your walls takes care of any dust and dirt
3. Measure. Measure again. Then slice.
Hands down, measuring the places where I wanted to put the paper, as well as where I needed to cut the panels, was the most time consuming aspect of this whole project.
Each panel is 24 by 48 inches. I installed the "Wild" panels between moldings on one living room wall, and since I wanted the effect of a painting, rather than a full wall of pattern, I didn't cut these panels. Still, I discovered that the moldings were different widths (one was 37 inches and the other was 39 inches; both were 55 inches high). I marked the places where the edges of the panel should go with a pencil.
For the chalkboard, I measured the freezer and the fridge separately, then sliced the paper so I'd get two panels that would sit in the middle of their respective appliance doors. And lastly, I decided to slice the "Book Worm" panel in half and stack the two halves on a door. This was easier than the chalkboard panels because the door had grooves that made it easy to line up the panels, and created a fun bookshelf-like effect on the door.
Tip: If you're like me, you require near Herculean levels of patience and time to cut a straight line or hang a picture straight. I found the easiest way to use this wallpaper was not to think of it as a substitute for paint, but as a substitute for a painting. Rather than papering an entire room, try hanging a full panel on a bare wall to get an interesting trompe l'oeil effect, or hang it vertically as an accent on a door.

Sticking the top few inches to the wall makes it easier to pull off the backing in a smooth, straight motion
4. Stick the paper
The next step is to peel off the backing and adhere it to the surface.
Tip: The easiest way to do this is to peel the top two corners, then bend the backing so that it doesn't re-stick to the paper itself. Peel off a two- or three-inch strip at the top, then stick that to the wall. From below, pull the backing off in a slow, straight motion, smoothing with your hands as you go.
5. Get rid of bubbles and creases
Even if you stick the paper to the wall as smoothly as possible, some air bubbles and seams may still be disturb the surface. This is where it comes in handy to use a busy pattern: the bubbles barely showed up in the "Wild" and "Book Worm" prints, but were pretty noticeable on the chalkboard panel.
Tip: Chasing Paper recommends popping air bubbles with a safety pin, then smoothing them out, which does help. I also found that running a fingernail carefully over a crease helped get rid of it.
Conclusion
All in all, I'm satisfied with my purchase. The interesting patterns bring life to my walls, and the chalkboard panels gives my dingy fridge a sophisticated look. Plus, I did it all in well under a couple of hours.
But, you may be wondering, does the paper really remove as easily as they say? Stay tuned. In an upcoming post, I'll be testing whether it's as "temporary" as advertised.

To get rid of creases and bubbles, use a fingernail or a safety pin--but carefully
Related:
Decorate like a commitment-phobe with removable wallpaper
8 easy upgrades to make your rental your own
NYC Renovation Qs: 7 things to consider before wallpapering your apartment


