Revive a long, dark hallway with a two-toned paint job
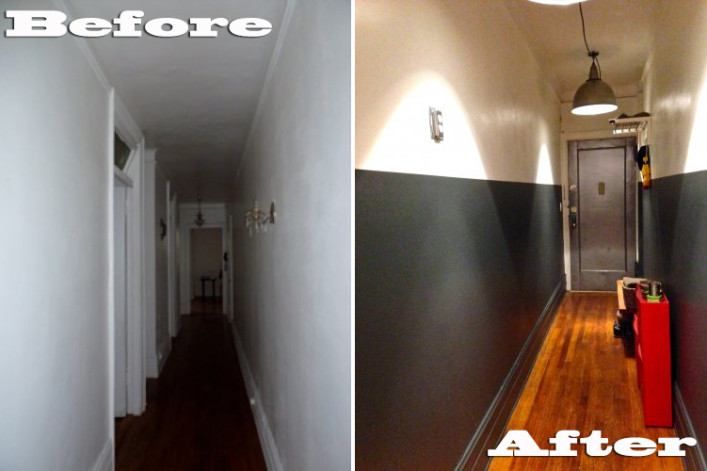
After the first phase of our hallway facelift was complete, and we had our gorgeous pendant lamps hanging along the formerly dark tunnel of an entranceway, it became clear that we had to paint the walls next. (Nothing like new light fixtures to illuminate exactly how cruddy your walls look.)
I considered painting the first half of the hallway (closest to the front door) one color, and the second half another color, but abandoned that idea because I wanted the hallway to look and function as its own self-contained space.
After hitting the Internet for some background research, we discovered that adding details like a chair rail was one of the best ways to add visual interest. Painting the bottom and top halves of the wall different colors would also add a kind of architectural feature to break up the space.

This example, from Benjamin Moore, inspired the look we wanted: a dark color on the bottom half of a wall provides maximum visual interest
I particularly loved the idea of using a really dark color as the grounding color. But would it work in our hallway? I've made mistakes with paint colors before, so I wanted to be sure that a dark color wouldn't make the windowless hallway feel even gloomier. I stumbled on a great bit of advice from a color expert: Apparently, bright colors will never “come to life” in a dark space. If anything, light colors will serve to point out the shades of the room, whereas rich colors can hold their own in the absence of natural light. And besides, if a room is dark, you’re always going to be turning on the light anyway, so in a way, it will always be bright.
As I knew from past painting projects, warm colors like red tend to “advance,” making the wall you paint it on seem like it’s closing in. Cool colors, on the other hand “recede.” So this dark grey color with bluish undertones, called "Flint," which I fell in love with at the Benjamin Moore store, would work perfectly! As for the top half, we decided not to paint it and to leave it the same basic decorator's white.

"Locking" the edge of the wall with tape helps stop one color from bleeding into another
Using the same technique as with our office paint job, we first marked out how high we wanted the dark color to go and taped it out with painter's tape. We decided on the five foot mark, which was the same amount of subway tile we used for our kitchen backsplash. We thought the echo would tie the spaces together. Next, we “locked” the edge of the tape with some leftover white paint we had originally used on the hallway. “Locking” means nothing more than painting a thin layer of white on the edge of the tape between the light and dark colors to prevent the dark color from bleeding outside the border, giving you a clean line.
After that, it was just a matter of filling in our chosen paint color. We had decided to paint the baseboards the same dark color as well.

The two-toned wall makes its debut
At first, we were overwhelmed. The Flint shade seemed almost black, like a blackboard, and together with the industrial pendant lights, it felt almost like a high school gym.
Before panicking, I went online and bought a wall decal of three birch trees and a couple of birds, thinking the $80 investment would help soften the look.

A nature-themed decal adds warmth and more visual interest to the hall
But by the time they arrived, I hesitated to apply them--the space had enough “interest” already. Still, we applied one tree and a couple of birds, and decided it lends an inviting touch without being kitchsy.
In fact, after a few days, we adjusted to the Flint wall, and it's started to grow on us! It's something completely different from what we’ve done and makes it feel like we're in a new apartment.

The final product--with industrial light fixtures and new paint
Related:
Brighten up a long, dark hallway with a DIY facelift
NYC Renovation Chronicles: Where to find inspiration that actually works in a NYC apartment
NYC Renovation Chronicles: 3 DIY projects worth trying yourself
6 of the most popular paint colors for NYC apartments right now


